Using Traefik, Docker, and Let's Encrypt to manage multiple local development projects
TL;DR
Fine, just skip directly to the Github repo that has a complete example of how to do this:
https://github.com/jimbojsb/traefik-docker-local-dev
My expectation is you make your own private version of this repo with these files as the skeleton. You may never need anything more than these files depending on how crazy you want to get with the feature set of Traefik.
Background
This is something multiple people have asked me how to achieve, so I finally sat down to write this up. This guide will show you how to take an existing collection of web applications that listen on port 80 for local dev and give them a fully working SSL setup. It will also allow you to not have to manually map high-numbered ports for them, and to be able to run all of them at the same time, rather than having to share port 80, or 8080, or keep some sort of external list of which app is using which port.
This assumes you already have a fully functional Docker and Docker Compose setup, and are reasonable well versed in using them, as I’m not attempting to explain how any of the Docker stuff actually works, only how to use it to build a Traefik environment. It also mostly assumes you understand the mechanics of a reverse proxy well enough to grok the plumbing of all of this once it’s laid out for you. I would suggest that this is not a guide for beginners.
What is Traefik
Traefik is an extremely powerful reverse proxy that’s written in Go. It’s very mature and is designed to be used in production environments, but it’s also easy to do really cool things with it on your local machine, as we’re about to see.
This seems more complicated than doing nothing…
It definitely is. However, it’s fun to work on, and makes local dev a bit cleaner. It also tests your app configurations more as if they were in production, as with production Docker setups, Kubernetes ingresses, and edge-side TLS termination, it’s more an more likely that your app will be running behind some sort of reverse proxy in production, so why not mirror that locally and get some benefits out of it at the same time?
Step 1: Get a real domain name, and host it in public DNS
In order to get “real” SSL/TLS working, you need a real, publicly-registered-on-the-internet domain name. With the availability of .dev domains from Google’s get.dev, my recommendation would be to buy one of these. There’s also no reason you can’t use a subdomain of an existing public domain name that you already own.
My perferred hosting provider for small personal projects is Digital Ocean. For our purposes here, they are specifically nice because unlike AWS/Route53, they don’t charge for hosting a domain in their DNS system. The rest of this article assumes you’re using Digital Ocean’s DNS, but other providers that are known to work with the Traefik certificate resolver are listed here. If for some reason Digital Ocean doesn’t work for you, I think Cloudflare would be my second choice.
The other upside of using a real public domain for this setup is that unless you need to work entirely offline (something that for me personally has become so rare that it’s not worth worrying about), you don’t need to run any sort of local DNS resolver like DNSMasq, as you might find recommended in various tutorial that are similar to this.
Once you have a domain registered and properly set up with nameservers (again, in my case, this is going to be ns1.digitalocean.com and ns2.digitalocean.com), we need to create some A records. For my setup, I point everything to 127.0.0.1, as I’m only going to be using this domain for a singular purpose. By pointing it all to 127.0.0.1, any time we use that domain or a subdomain, it’s expected to resolve right back to your local machine, where you’ll be running Docker and Traefik.
Here’s an example of what my setup in Digital Ocean looks like for joshbutts.dev:
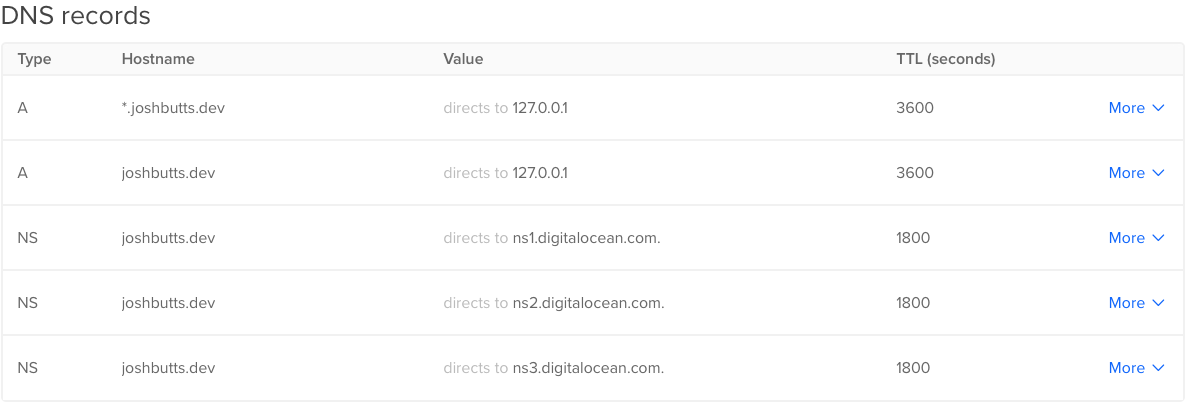
Notice the use of the wildcard to catch all subdomains. This means I never have to touch this again when I want to add more projects to this system locally. Note, most properly behaving DNS providers will resolve actually specified domains before wildcards, so if you want to have some other subdomains manually specified for some reason, you can still use a wildcard as the “catch all”.
Step 2: Make a new project / Git repo
While it’s certainly possible to apply these techniques to a single already existing project, the intention is that you’re creating a new repo to store files and configuration for this system, which would sit above and outside any specific app that is connected to it. I like to use the top-level domain that I bought as the name of the project.
NOTE: If you’re going to push this repo to Github, I’d highly recommend you make it a private repo. I’m going to advocate that you store an API as an environment variable in your docker-compose.yml file, and you don’t want to be exposing that to the world.
Step 3: Set up a new docker-compose.yml file
We’re going to use Docker Compose in this new repo to spin up Traefik and an overlay network for our other apps to attach to. Below is the entire contents of the file, followed by explanations of what each part achieves. I’ve marked the lines I’d expect you’d be changing out with the name of your actual domain name.
---
version: "3.7"
services:
  traefik:
    container_name: mydomain.dev #change this line
    environment:
      DO_AUTH_TOKEN: xxxxxxx #change this line
    restart: always
    image: traefik
    networks:
      - mydomain.dev #change this line
    ports:
      - 80:80
      - 443:443
      - 8080:8080
    volumes:
      - "/var/run/docker.sock:/var/run/docker.sock:ro"
      - "./traefik:/etc/traefik:ro"
networks:
  mydomain.dev: #change this line
    name: mydomain.dev #change this line
As you can see, pretty short and simple but there’s a decent amount of magic going on here that we need to discuss. We have just one service named traefik defined in this file. The name you choose for this service has no impact on anything.
Now, lets review what these various directives are actually doing:
image
image: traefik
The Docker image we want to use comes off Dockerhub’s public library of “blue ribbon” packages, so we can just reference it by the short name traefik. This also implies that you’ll always be getting the latest version of the image. If that makes you nervous, you could specify someting more specific like traefik:2.1, which was the latest version as of this writing.
environment
environment:
  DO_AUTH_TOKEN: xxxxxxx
Traefik’s DNS Challenge providers make use of environment variables to provide the API keys for DNS record management. We’ll discuss this more later, but for Digital Ocean, you’d generate an “Personal Access Token” API key in your account dashboard and use that as the value for DO_AUTH_TOKEN. For other DNS providers, the values here may be different. Documentation for this is available here.
restart
restart: always
This is up to your personal preference, but I like to add restart: always to this service because that way I don’t have to remember to start or stop this when I go to start working on something. When idle Traefik consumes basically zero CPU and only a few MB of RAM.
container_name
container_name: joshbutts.dev
Docker Compose will automatically name the containers under its control by combining the directory name of the project with the service name and a numeric suffix. This is fine, but also given that we know there will only ever be a single one of these, and I’m feeling particularly controlling, I’m overriding the name that will be generated for this container. Totally optional.
ports
ports:
  - 80:80
  - 443:443
  - 8080:8080
This setup means Traefik will own ports 80, 443 and 8080 on your local system. 80 and 443 will be used to host your HTTP applications, and for the purposes of this example, we’re primarily concerned with 443 because we’re going to set up SSL/TLS. 8080 is used for serve the Traefik API and Dashboard. 8080 is optional, but it’s definitely useful especially when you’re just getting started so you can see that your containers are all connected up correctly.
volumes
volumes:
  - "/var/run/docker.sock:/var/run/docker.sock:ro"
  - "./traefik:/etc/traefik:ro"
We need to mount some volumes here in order for Traefik to be able to function correctly. The first is the Docker socket. Traefik will use this to listen to events on the Docker API so that it can automagically register new services when you start them via Docker. The second one is mounting a local directory we’ll create in this project into the place where Traefik expects its configuration files to live by default. We mount both of these with the :ro flag because Traefik has no need to change or write to any of these files.
networks
networks:
  joshbutts.dev:
    name: joshbutts.dev
Docker Compose will automatically (in recent versions) create an overlay network to connect your containers to. By default that network is named similarly to how containers are named, by using the directory and service names. Here we are overriding that naming, and then we also manually specify that overridden name in the service definition section as well. This override is optional but I strongly recommend you do it, because you’ll need to specify this name in the external projects that you want to proxy with Traefik, and it’s easier to remember a clean name (I’m using joshbutts.dev as the name so it matches domain name and the service name I specified) than it is to either go look up or try to remember how exactly Docker Compose named the network.
Step 3: Set up Traefik
We’re going to need some configuration files for Traefik. Nothing too complicated, and in many cases, you can actually configure traefik entirely from your docker-compose.yml by overriding the command for its container, but I find that a bit harder to read and manage. Also, should you ever want to expand on this, you may need to configure an option that’s not really possible on the command line, so I think going the config file route is ideal.
To get started, we need to make a traefik/ subfolder in our project. This will be referenced by the volume mapping we created in the docker-compose.yml. Inside traefik/ we need to create the master Traefik config file, called traefik.toml I’ve pasted the entire contents below, and marked the lines where you’d want to change out my example values for your own.
[entryPoints]
  [entryPoints.http]
    address = ":80"
  [entryPoints.https]
    address = ":443"
[providers]
  [providers.docker]
    exposedByDefault = false
    network = "mydomain.dev" #change this line
[api]
  dashboard = true
  insecure = true
[certificatesResolvers.default.acme]
  email = "me@mydomain.com" #change this line
  storage = "acme.json"
  [certificatesResolvers.default.acme.dnsChallenge]
    provider = "digitalocean"
    delayBeforeCheck = 0
Now, as with the docker-compose.yml, lets discuss briefly what all this stuff in traefik.toml does.
[entrypoints]
[entryPoints]
  [entryPoints.http]
    address = ":80"
  [entryPoints.https]
    address = ":443"
The entrypoints sections describes effectively, what ports should Traefik listen on to route traffic. We’ve got the standard HTTP and HTTPS ports here. The leading colon implies “listen on all network interfaces”. The .http and .https suffixes on the entrypoints directive are user-supplied names. You could change those to say for example, web, and websecure, but why would you? If you changed those, you’d also need to change how you reference them in step 5 later on.
[providers]
[providers]
  [providers.docker]
    exposedByDefault = false
    network = "mydomain.dev" #change this line
The providers section tells Traefik where to look for backend services that it should route traffic to. The docker provider means that Traefik will look for containers using the Docker API and connect them automatically if they have the appropriate labels on them. The value of network here needs to match whatever you chose for the name of the network in your docker-compose.yml file. exposedByDefault decides whether Traefik should attempt to wire up every Docker container it can find, or alternatively, if the Traefik linkage should be an “opt in” process. Given that it’s so easy, as we’ll see, to opt in, I always leave this set to false.
[api]
[api]
  dashboard = true
  insecure = true
Traefik has a full REST API (documented here). It’s required that you enable the API in order to use the dashboard. As long as you’re not trying to use this guide for anything other than local development, these settings are safe and easy. insecure=true tells Traefik to not bother with setting up HTTPS for the backend dashboard. By default, enabling these options will make the dashboard available at http://localhost:8080
[certificateResolvers]
[certificatesResolvers.default.acme]
  email = "me@mydomain.com" #change this line
  storage = "acme.json"
  [certificatesResolvers.default.acme.dnsChallenge]
    provider = "digitalocean"
    delayBeforeCheck = 0
This section is where we’re going to tell Traefik to use Lets Encrypt to generate SSL certificates for us. Where you see default in this section, that is a user-supplied name. It could be called anything, but we’ll need to reference this name later in step 5. If you’re not doing any other configuration beyond what I’m recommending here, default is as good a word as any. acme is the protocol by which Lets Encrypt certificates are issued. for storage="acme.json", this just tells Traefik where to hold on to the data it gets from the Lets Encrypt API. No reason to mess with that one. All Lets Encrypt certificates require that you submit an email address, so change the email value to be your personal email address.
We’re going to tell Traefik to use DNS Challenge as it’s method to issue the certificate. In order to do this, Traefik needs to have API access to whomever your DNS provider is (I’m using Digital Ocean) so that it can create a TXT record on your behalf to verify your ownership of the domain. delaybeforecheck = 0 tells Traefik that it does not need to pause after creating the DNS record before attempting to validate the certificate. If you’re not using Digital Ocean, your options here will look different, and you’ll need to reference the Traefik docs here
Step 5: Start Traefik
If you’ve done everything right, we’re ready to start Traefik using Docker Compose. This is as simple as typing docker-compose up -d at the top level of your project folder. You should see output that looks like this:
$ docker-compose up -d

Creating network "joshbutts.dev" with the default driver
Pulling traefik (traefik:)...
latest: Pulling from library/traefik
c9b1b535fdd9: Pull complete
c141e361698e: Pull complete
79168d1112b9: Pull complete
6d494c7ddd01: Pull complete
Digest: sha256:0b55d2ea61610454d36c0309c8b63ef5ca3d0e03fd075bbd888dbb52271a7500
Status: Downloaded newer image for traefik:latest
Creating joshbutts.dev ... done
If that’s gone well, you can then check your dashboard at http://localhost:8080. It should look something like this:
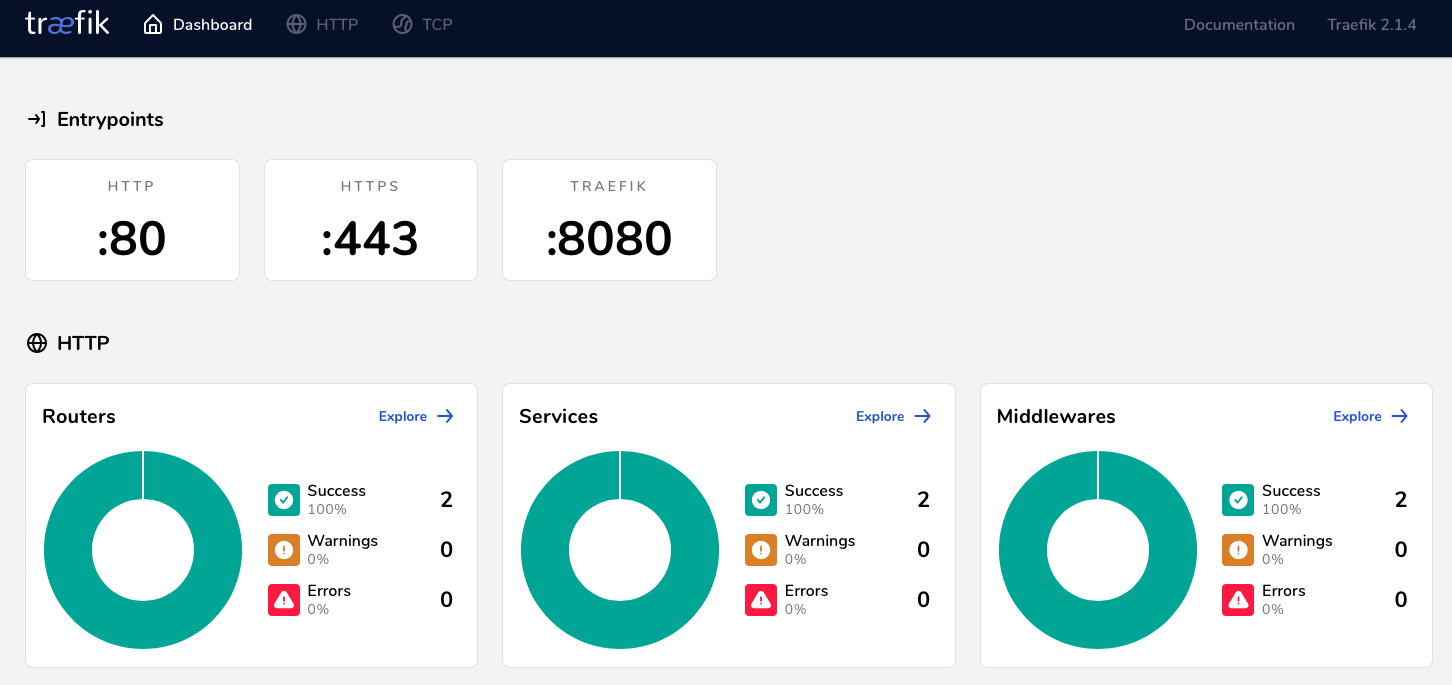
If everything’s looking good, now would be a good time to commit your changes in this repo. For the scope of this guide, nothing more should be needed, and this should “just work” going forward. You can always come back and check the Traefik dashboard to see the status of things in the future.
Step 5: Connect an actual project to a subdomain
Assuming you’ve already got some projects that you want to use, and those projects are already up and running with Docker Compose, we now just need to make some minor adjustments to the docker-compose.yml files for those projects to connect them up to our Traefik.
Here’s an example docker-compose.yml from a CraftCMS project I’m working on, partially redacted for brevity. This is before we’ve made any changes.
---
version: "3.7"
services:
  web:
    image: jimbojsb/craftcms
    ports:
      - 8000:80
    environment:
      ENVIRONMENT: dev
      # redacted/shortened here
    volumes:
      - .:/app:cached
    depends_on:
      - mysql
  mysql:
    image: mysql:5.7
     # redacted/shortened here
Now we’ll need to add a few things to get this hooked up. Step one will be determining the subdomain we want to use. We’ll use myapp as an example, but my convention would be that this is probably the name name as the directory this project lives in, e.g. the name of the project. This would mean that this app will be accessible in your web browser at https://myapp.mydomain.dev.
Note: While it’s not technically a problem, I’d recommend always sticking with one level of subdomain. If you need some sort of additional namespacing, use dashes. For example: myapp-web and myapp-cms.
Here’s the docker-compose.yml for our project with the changes applied:
---
version: "3.7"
services:
  web:
    image: jimbojsb/craftcms
    environment:
      ENVIRONMENT: dev
      # redacted/shortened here
    labels:
      - traefik.enable=true
      - traefik.http.routers.myapp.rule=Host(`myapp.mydomain.dev`)
      - traefik.http.routers.myapp.entrypoints=https
      - traefik.http.routers.myapp.tls=true
      - traefik.http.routers.myapp.tls.certresolver=default
    networks:
      - mydomain.dev
      - default
    volumes:
      - .:/app:cached
    depends_on:
      - mysql
  mysql:
    image: mysql:5.7
      # redacted/shortened here
networks:
  mydomain.dev:
    external: true
Notice at the bottom of the file, we’ve added a networks section. We’re defining a network that’s named the same as the one we defined in our Traefik repo, and telling Docker Compose that it’s external to this project. Once we do this, we can connect our containers to it, so that Traefik can make connections to them.
Because we need to specifically tell Docker Compose to give our web container access to the mydomain.dev overlay network, we need to add a networks block into the web service definition, and list it there as well. We also list the default network, which means the web container can talk on the network that Docker Compose creates for each project, as that’s what network our mysql container will be placed on. There are obviously lots of ways to arrage this, but I found this to be the simplest to model and requiring the least amount of duplication of definition within a docker-compose.yml file.
Another change we’ve made here is telling Docker Compose that our web service should no longer expose its internal port 80 to external port 8000. While it’s fine to leave this, Traefik is going to take care of routing all our web traffic, so there’s no reason to bother exposing any web ports in this project anymore. Those are surfaced exclusively by the Traefik container now.
Lastly and most importantly, we’re adding some labels. The labels are what Traefik is looking for to tell it how to connect this container to it’s router. In these labels where you see routers.myapp, myapp is a user-supplied name. You should use the name of your project here. Lets review what each label does:
traefik.enable=true: Tells Traefik to pay attention and hook up this container. Not required if you choseexposedByDefaultin yourtraefik.tomltraefik.http.routers.myapp.rule=Host(`myapp.mydomain.dev`): This is the primary rule that tells Traefik how to map the subdomain you want to use to this container when you visit it in a web browser.traefik.http.routers.myapp.entrypoints=https: Tells Traefik that this site is exposed on the entrypoint from ourtraefik.tomllabeledhttps. You could also allow an app to be onhttpandhttps, but in most cases, there’s no good reason to.traefik.http.routers.myapp.tls=true: Tells Traefik to use TLS with this application. Note that Traefik is extremely configurable, so just because you’re operating on port443does not necessarily mean that you’ve decided that should be a TLS port. That flexibility is the reason this configuration seems slightly more verbose than it otherwise could be.traefik.http.routers.myapp.tls.certresolver=default: Use thecertificateResolvernameddefaultfrom ourtraefik.tomlto figure out how to issue and serve a valid certificate. In our case, this is going to use Lets Encrypt.
Once you’ve applied these small changes to your docker-compose.yml for any project you want to use with your Traefik container, you’d then docker-compose up -d that project. That will cause Traefik to pick up those changes, and you’ll see them reflected in your Dashboard.
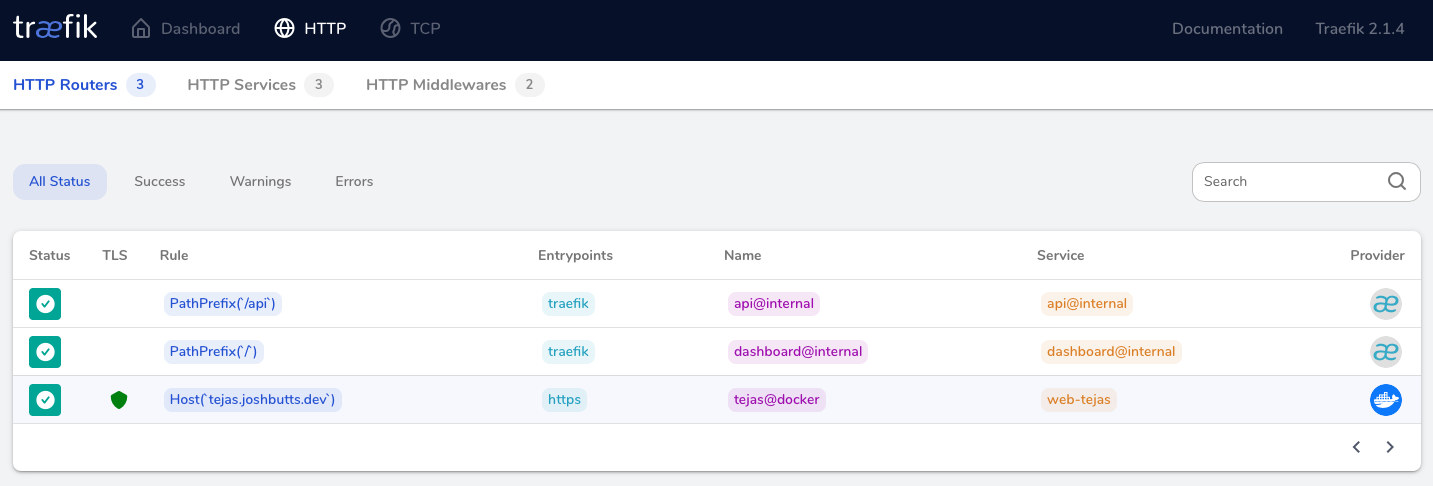
If all has gone well, you can click “Explore” on the HTTP Routers section of your Traefik dashboard and see your new service listed. You’ll also be able to navigate to your services on https://myapp.mydomain.dev now, and notice that it has a fully functioning SSL Certificate and all is well with the world. Here’s a screenshot of my instance of Traefik with a project called tejas registered to it:
Wrap Up
I hope you’ve found this helpful. As I said at the beginning, this is definitely an opinionated setup, and there are a dozen other ways to achieve something similar. Feel free to take the example repo from Github and modify to to fit your own use case.